Make your own falconry hood
 Making your own falconry hood can be a lot of fun and save you money as well. You can tailor it to fit your bird perfectly and add your own embellishments.
- Make your own falconry hood
- Materials needed
- The Pattern
- Tip when cutting your leather
- Transfer your pattern
- Preparing your hood for tooling
- Tooling the leather
- Stamping the leather
- Piping and Top Knot pieces
- Braces
- Stitching Holes
- Sewing the hood
- Smoothing the stitching
- Finish the edge
- Piping
- Top Knot
- Lacing The Braces
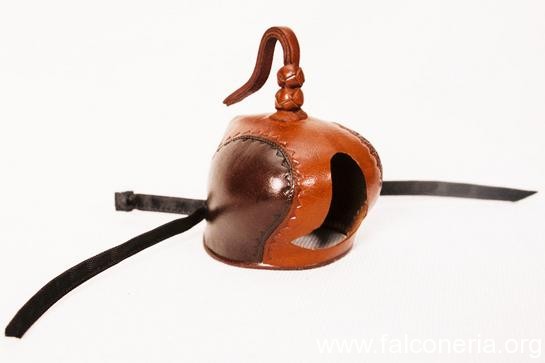
- The finished hood
- Fitting the hood and Final Adjustments
This hood is so easy to make and doesn’t need to be blocked. I really like how they fit my birds and they seem very comfortable on them. I have two female Harris Hawks. The younger bird took to the hood the very day I picked her up, but my older bird never took to the hood very well. I bought a very nice Arab style hood for her which I used off and on for 5 years. Until my dog ate it. I needed a hood right away so looked into making one. I found this hood to be so easy to make. I can make one in a day. And, it turns out, fits my bird better than the Arab hood did. She is much calmer when she wears this hood.
Materials needed
Exacto knife and extra blades
Waxed dental floss
Large eye needles
Awl or small drill for the sewing holes
Leather dye
Forceps or very small needle nose pliers
Stitch marker
If you plan on tooling your leather:
Tooling stamp
Swivel knife
Rubber Cement
A firm surface such as X-ray film

The Pattern
The first thing you need to do is measure your bird. This might require the help of another falconer. Measure the widest part of your bird across the head from eye to eye in centimeters.
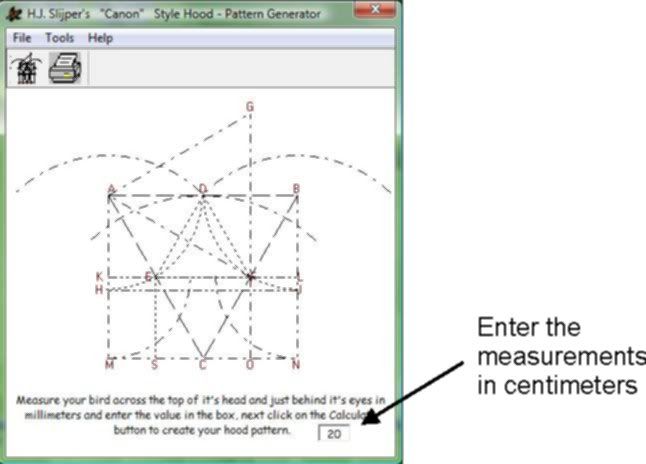 Open the Hood Pattern Creator. Down at the bottom is a small box that you put in the size of the hood you want. Click on the top left button to calculate the hood pattern. Print the pattern on heavy card stock. You may want to keep the pattern for future use.
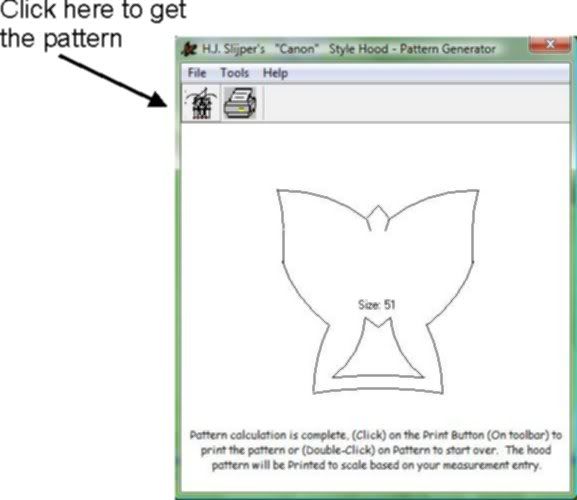
 This hood is 52 cm and is intended for a female Harris Hawk, flying weight of 980 grams. My smaller female Harris Hawk flies at 850 grams and takes a hood size 51 cm. You will have to makes a few to find just the right fit for your bird.Carefully cut out the pattern with an exacto knife.
All the measurements you see here are for my tooling border, braces slits and top knot slits. If you don’t plan on tooling your hood, you just need the braces slits and top knot slits. You might want to make a plain hood for the first try. This way you don’t spend a lot of time on the tooling only to find out it doesn’t fit your bird.
Brace Slits – The width of your braces plus 1/16 to 1/8″. You don’t want the slits to be tight. Make these slits 1/4″ apart.
Top Knot Slits – Using the third largest hole punch, punch a hole in the center of where your top knot will go. The slits are the width of the top knot strips. These slits should be tight. Make these slits 3/16″ apart from the center hole.
Tip when cutting your leather
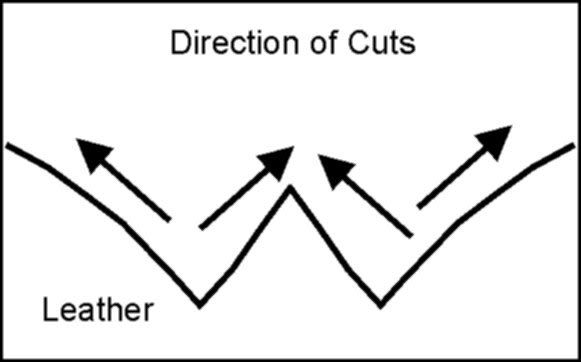 Always cut from the corner out, not into the corner. This will prevent any slips and inaccurate cuts. If you notice the tab at the top of the pattern. It shows two lines that should be cut as well. I’ve found that it’s not necessary to cut these for smaller birds but I do cut it for an eagle size hood. It’s completely up to you.
 After cutting out the pattern, trace it on the back of the leather and again carefully cut it out using a new exacto blade. Don’t forget the tip about cutting away from the corners.
Transfer your pattern
I’m going to be tooling this hood and will show you as I go. I cut the slits for the braces and top knot before I start tooling. I then ignore them as I do the stamping.
If you don’t plan on tooling your hood, skip down to drilling the holes. If you plan on dying your hood, do that now and allow it to dry.
Preparing your hood for tooling
Glue your hood to a firm surface
 Using fresh Rubber Cement glue the hood to a firm surface. I used X-ray film cut down to a manageable size. Gluing the leather down is very important if you are planning to tool it. Tooling will cause the leather to distort and “grow” and the hood will never fit right.
TIP: Use fresh rubber cement and only apply it to the X-ray film. If you use old glue and apply it to both the X-ray film and the hood, it will be very difficult to remove the hood when your done tooling.
Before any tooling can be done, the leather must be damp. Wipe the entire surface with a damp sponge and allow to sit for a few minutes. The leather may not look wet, but it will feel cold.
Tooling the leather

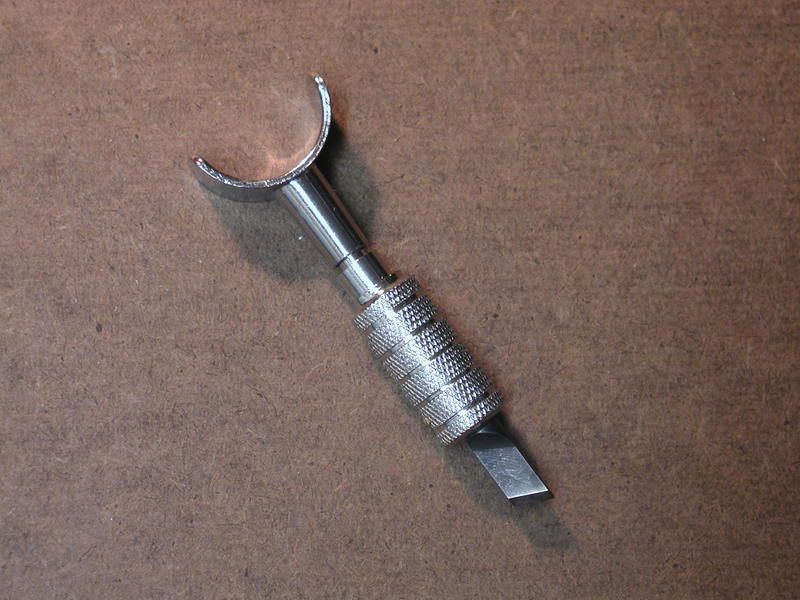
The swivel knife is invaluable when tooling leather. It’s used to cut the border lines for a crisp edge. When using the knife, be sure not to cut more than half way through. An Exacto knife just won’t work here because it’s too thin and wont’ give you the proper cut.Using the swivel knife, cut all the way around the hood.
Next comes the beveling. My beveler is pretty small so it takes me a little longer to go all the way around. Some day I’ll buy a larger one. But it’s good for getting into the small corners. It’s important to every now and again apply more water lightly. You don’t want to flood it, just keep it moist.
Stamping the leather
 I began stamping the leather. You can see that I started right in the middle and worked my way out. As you get to the edges, only do partial stamps so you don’t go into the border.
 I finished with the first stamp. I then went back with an edge tool and stamped around the boarder again for a finished look. I’ve also added the stitching marks while the leather is still wet. The tool I used for the stitching marks comes from a fabric store and is used to transfer patterns onto fabric. I found it gave me just the right spacing for the holes. If you have a stitch marker that has marks too close together, just use every other mark.
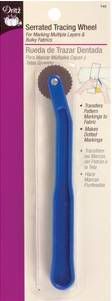
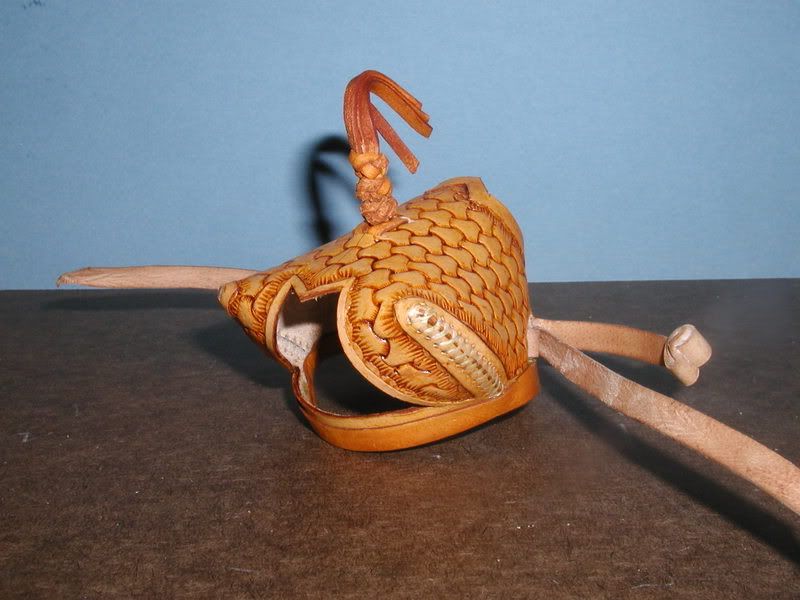
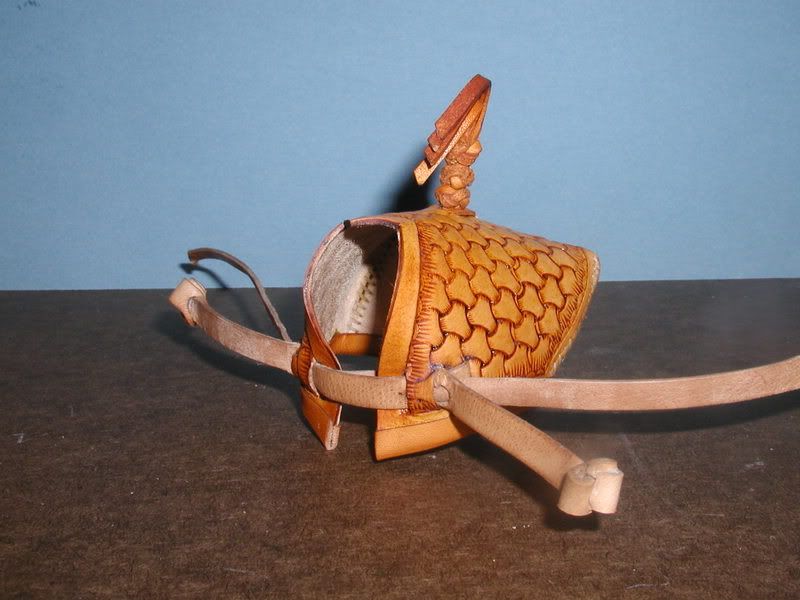
Piping and Top Knot pieces
 The hood has been dyed using a water base dye. I will put 2 to 3 coats letting it dry between each coat. The colors just get richer and richer with each coat. While the hood was drying, I made the piping, top knot and the braces. The piping and top knot have also been dyed. Let these dry. Do Not Dye the BracesPiping – Kangaroo – ½”x 8″ – make one
Top Knot – Kangaroo – 1/16″ x 9″ – make two
Braces
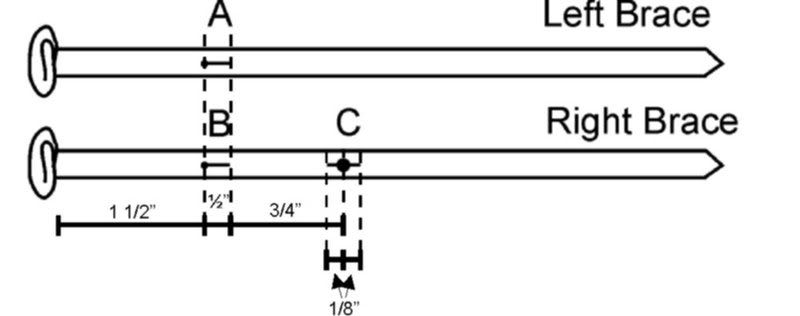 Making the Braces
1. Cut two strips from the tooling kip or kangaroo 1/4″ x 9″
2. Roll a knot at one end the same way you make jesses.
3. Left Brace – Measuring from the knot, mark 1-½” and 1 3/4″. Using the smallest hole punch, punch at the 1-½” mark. Using an exacto knife, cut a slit from the 1 3/4″ mark into the hole.
4. Right Brace – Measuring from the knot, mark 1 ½”, 1 3/4″ and 3 1/4″. Cut the hole and slit same as the left brace. At the 3 1/4″ mark punch a hole using the 3rd largest hole and cut a slit on either side 1/8″
Stitching Holes
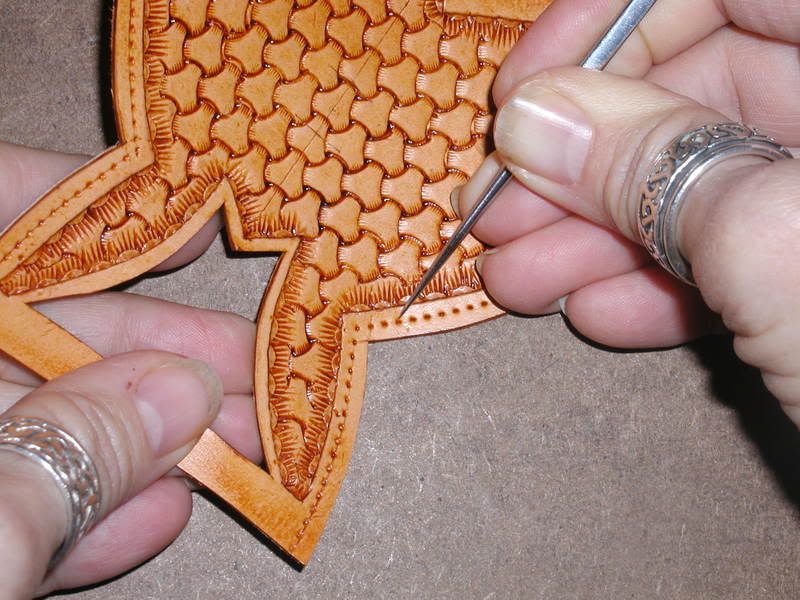 Now you need to make the stitching holes. The left picture shows me using an awl. When using the awl, be careful not to go too far, you don’t want the holes to be too large.
The picture below shows how I drill the holes. The device is like a Dremel with a very tiny drill bit. I got a box of various tiny bits from Harbor Freight many years ago for only about $10.00. Place a scrap piece of wood under the leather and drill straight down into the wood.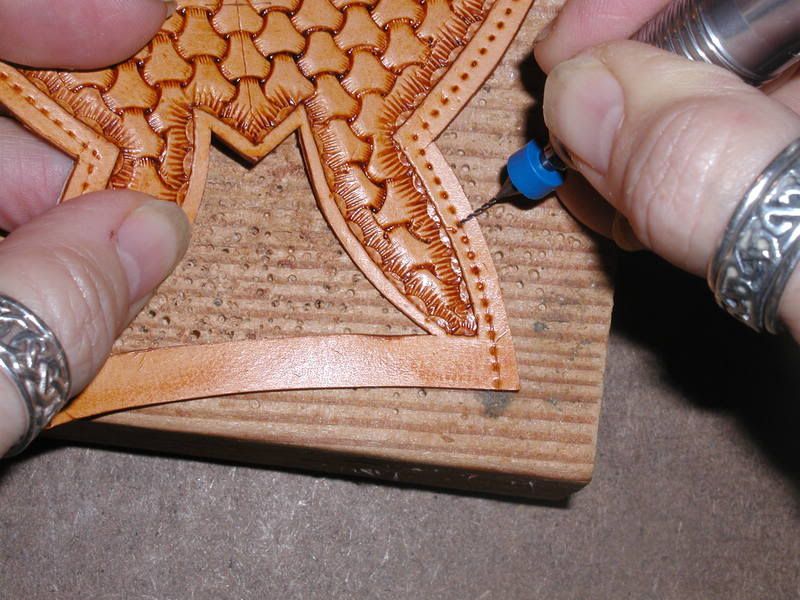
Sewing the hood
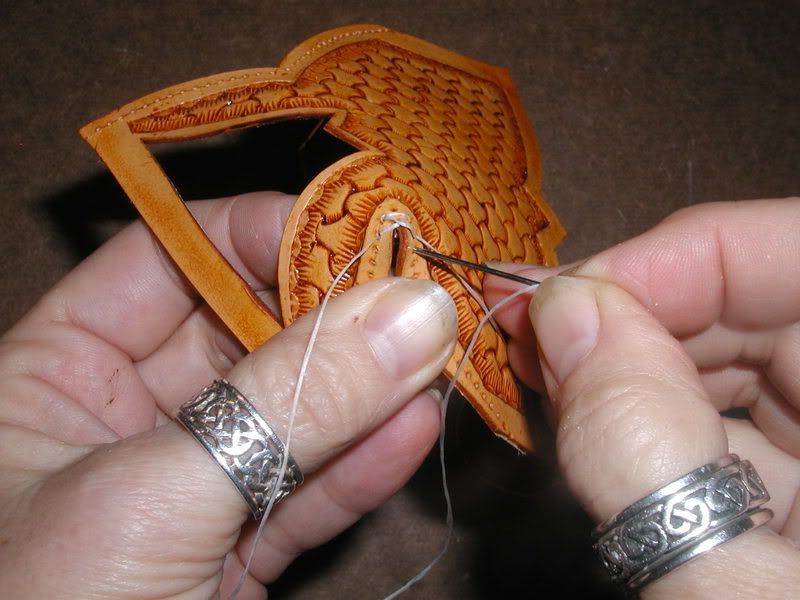 To sew the hoods together, I found waxed dental floss to work great. Cut a piece about 24″ long. It’s better to have too much than run out half way down and have to start over again. Using two needles, thread both ends.
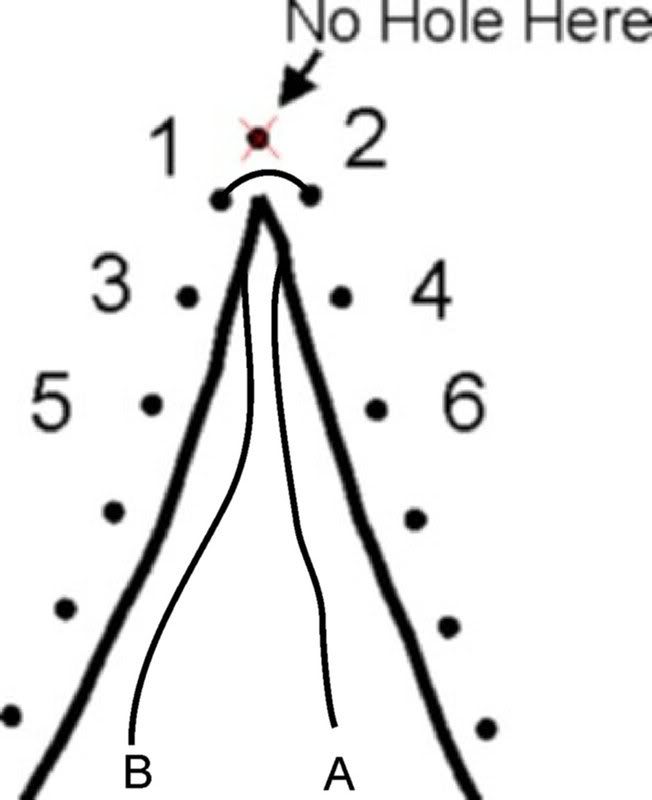 Stitching Pattern
Up 1, Down 2 – even the ends
A – up 1
B – up 2
A – Down 4
B – down 3
A – up 3
B – up 4
A – Down 6
B – Down 5
Just remember when you come up to the front, use a hole that already has thread in it. Be careful that you don’t go through the thread already there.
Going down to the back – use a new hole
 When you get to the end, you’ll notice something doesn’t look right. The back is longer than the front. Don’t worry, just stitch to the last hole of the front. Bring both ends back to the inside and tie a surgeons knot. Now sew the other side the same way.
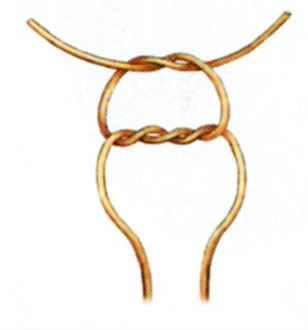
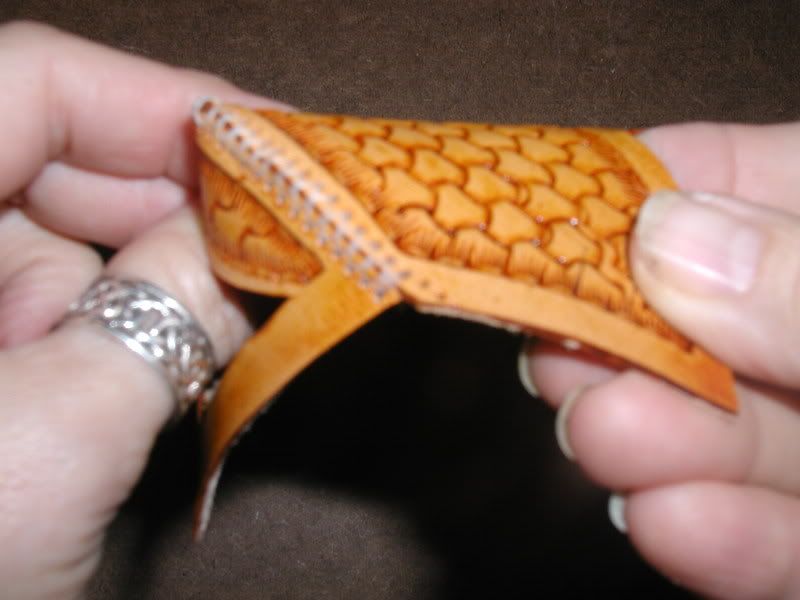
Smoothing the stitching
 Both sides are now sewn. Dampen the stitched area both inside and outside. Not too much water, just get it damp. Using a smooth rod, or a dowel, you want to roll the seam smooth. This will require another dowel for the inside. Sand the dowel round at the end to fit into the inside point. Insert the dowel into the point and along the stitching. Using the rod or another dowel, roll the seam smooth and flat. I like to round the point a bit as well. Don’t squash it too much.
Finish the edge
 Lets take care of the uneven bottom edge. Very carefully, trim off the back edge being careful not to cut the stitching or the knot. You won’t have to trim off more than 1/16″. It doesn’t have to be exact, the piping will cover all this anyway.
Piping
 The piping is important for two reasons. First it finishes the bottom edge and makes for a nice looking hood. But more importantly, it gives the bottom edge more support and keeps the hood in shape.Dampen the piping both front and back. Fold it long ways. Using your dowel, roll it over the piping to make it fold nice and flat. You will have to work a small section at a time. The leather will want to fold every place but where you want it to. Gently open it again and apply Rubber Cement to the inside. Also, apply a little bit of rubber cement to both sides of the very edge of the hood. Be careful that you don’t go too high or the rubber cement will show. Allow both pieces to dry for a minute or two.
 Here’s the tricky part. You want the hood edge to lay right in the fold. Start a little back from the end of the piping and carefully lay the hood edge right in the fold of the piping. Work along the hood edge working the piping smooth as you go. Try working just the outside first, then fold the piping to the inside.Use your dowel and roll along the edge from the inside to smooth it down and to sharpen the fold. Trim the ends.
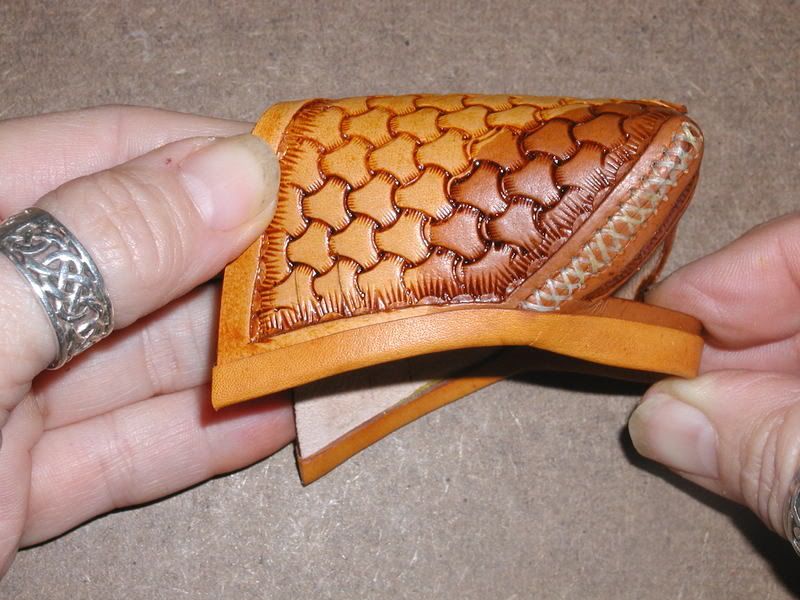
The piping glued and trimed.
Top Knot
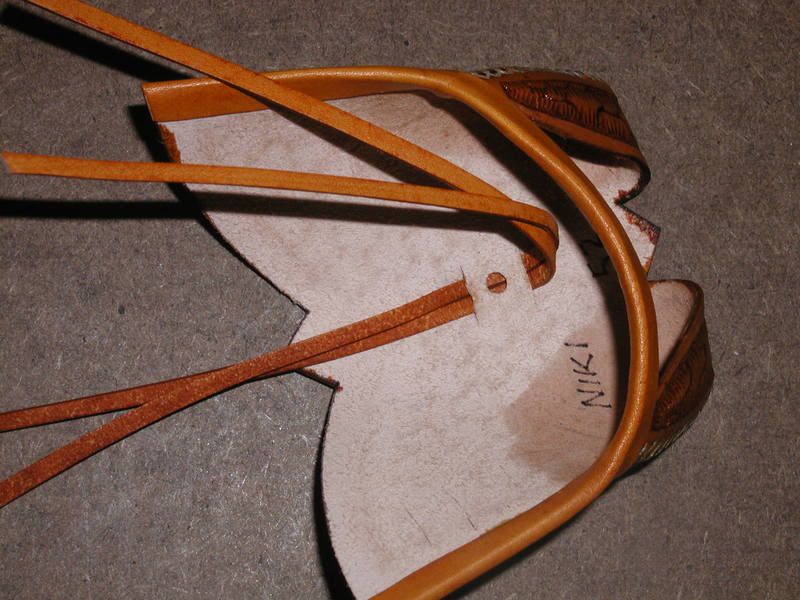 Here is where you will really need the forceps. Insert the two strips for the top knot as shown in the photo. Even them up and be sure they are flat and not laying on top of each other. Then bring them up through the center hole.
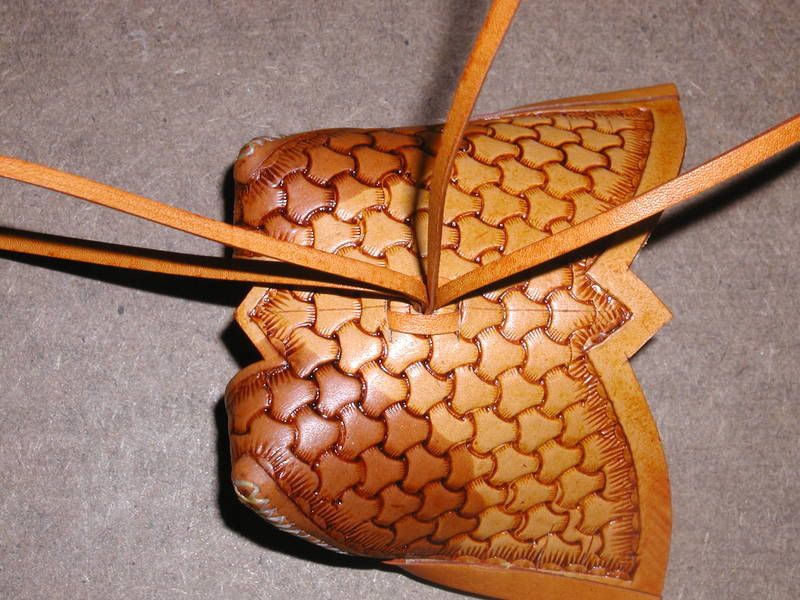
 Three Turks Head Knot. I have to admit, I don’t do the knots very well, but I’m getting better. Trim the ends of the leather strips. Wet them and form them into a pleasing shape.You can have a bit of fun here. Add a decorative bead, then a knot to hold in on. Put feathers if you want a really fancy hood.
Lacing The Braces
Your almost done
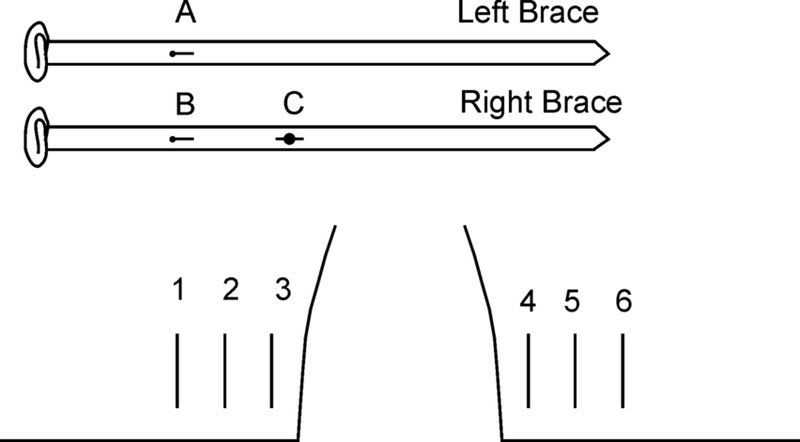
Lacing the braces is a bit complicated at first, so follow each step slowly.
Left Side
1. Go down 2 until A is at 2
2. Come back up at 1
3. Insert forceps down 3, up 2, through A , grab brace end and pull through.
Right Side-
1. Follow the steps for the left brace going through B
2. Insert forceps on Left side of hood through A, down 2, up 3, grap right brace and pull.
Back to the Left Side –
1. Insert forceps through B, down 5, through C up 4, grap the Left brace and pull through. This side will be very tight so work carefully.
Work the braces open and closed several times to get them working smoothly. Your hood is complete!
The finished hood
Fitting the hood and Final Adjustments
Before you put the hood on your bird, wet the beak opening with some water to make the edges soft. Now place the hood on your bird and close the braces. Notice how the opening sits on your bird. It’s important the the edge does not touch the birds mouth. Take note of where it’s touching and remove the hood. With sharp scissors, remove that area. Careful, just remove a tiny little bit at a time. Each time place it back on the bird and check it again.