Anklets
Also called braclets or cuffs
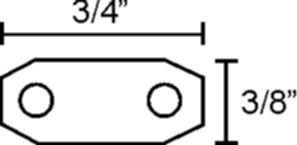
 1. Cut the top figure (anklet) out of a soft yet sturdy leather. Cut the bottom piece (plate) out of tooling kip.
2. Mark the center line for your stamping. Before you start stamping, wet the leather slightly. You want the leather damp, but not soggy. Allow it to soak in for a few minutes. When the leather looks dry, but is cold, it is ready to stamp. Make sure you use enough force when stamping to make a good deep impression. A few test strikes on some scrap is a good idea. Let it dry. You may want to dye the leather to make the numbers stand out more. Be sure to coat it with a leather sealer to waterproof it.
3. There are two ways to attach the leather plate to the anklet, glue alone or glue and sew it. I find the glue/sewing to be the most durable, but it is a lot more work.
Glue – Place the plate on the anklet and trace out where it will go. Use fresh contact cement and apply it to both the anklet (only where the plate will go) and the plate and allow to dry. Then carefully position it and press it on. As you press it on, form the anklet into a bit of an arch.
 Sewing – Sewing requires you to make stitching holes first (after it’s been glued on). Using an awl or a Dremel with a tiny drill bit, make the stitching holes all the way around and through both the plate and the anklet. Using a good leather thread, thread both ends with a needle and insert one needle through the plate and the anklet. Now it’s just a matter of sewing all the way around. Insert the needles from both sides into the same hole shown here. Pull each stitch snug against the leather. When you go all the way around, pull each needle through just one thickness of leather. You now have the thread between the leather pieces. Tie a good strong knot and tighten it so it ends up between the leather pieces. This way you don’t have any knot showing.
METHOD #2
If your using kip for the anklets, then you can stamp your phone number right on the anklet and skip all the sewing.
I like kip for anklets. The leather is strong, yet thin and light. I use leather that is 2 – 3 oz in weight. For larger birds like female red-tails you might want to use 3-4 oz leather.
Traditional Bewit
 1. Using the diagram on the left, cut a bell pad. This is used to prevent the metal of the bell from rubbing against your birds leg.
 2. Cut the bewit as shown above. Don’t make it any narrower than 1/4″. It will be too weak. The length is approximate. You don’t want it too tight or too loose.

4. Roll the end exactly the way you do when making leather jesses. Cut the slits as shown above.
 5. Thread onto the bewit, the bell pad, a reward tag, if you have one, the bell and the other end of the bell pad. The bewit is attached as shown here.
A Better Bewit
I was out flying my bird one season. All was well, when I noticed when my bird flew past me, it was very quiet. I walked over to where she landed and noticed she had lost not just one of her bewits, but both of them. I lost in that fiasco, a beautiful set of bells, a reward tag and a telemetry transmitter. I never did find that darn transmitter. With that, I decided to design a better bewit and this is what I’ve come up with. I have never lost one yet.

You will need shoelace grommets also called eyelet grommets. These can be found in your local fabric store. These grommets are a very small one piece grommet. You will also need the gommet setter. The whole kit is only around $5 – $8.
You also need rivets. These are the two part rivets that are used in leather work.
 The diagram on the left shows the two parts you will need. You can use any leather you like. Kangaroo works great for the smaller piece. I don’t have any dimensions for the smaller piece because it will depend on the size of the larger piece and the size of your bells and or telemetry.
Punch small holes on each end of the larger piece and set the shoelace grommets in them.
 Align the smaller piece with the bewit and punch a hole through both pieces at the end of the smaller insert. Set a rivet at one end of the insert. Thread your bell, reward tag and/or telemetry and set the second rivet at the other end.
These are easily attached to your birds leg by using a small cable tie. Simply cut the cable tie at the end of the day.
Thank you to: Kathie Miller